Build your web apps using Smart UI
Smart.QueryBuilder - configuration and usage
Overview
Smart.QueryBuilder represents a control for building filter queries. Queries with multiple groups of conditions and different operators can be created.
Getting Started with QueryBuilder Web Component
Smart UI for Web Components is distributed as smart-webcomponents NPM package. You can also get the full download from our website with all demos from the Download page.Setup the QueryBuilder
Smart UI for Web Components is distributed as smart-webcomponents NPM package
- Download and install the package.
npm install smart-webcomponents
- Once installed, import the QueryBuilder module in your application.
<script type="module" src="node_modules/smart-webcomponents/source/modules/smart.querybuilder.js"></script>
-
Adding CSS reference
The smart.default.css CSS file should be referenced using following code.
<link rel="stylesheet" type="text/css" href="node_modules/smart-webcomponents/source/styles/smart.default.css" />
- Add the QueryBuilder tag to your Web Page
<smart-query-builder id="querybuilder"></smart-query-builder>
- Create the QueryBuilder Component
	<script type="module">
		Smart('#querybuilder', class {
			get properties() {
				return {
				allowDrag: true,
				fields: [
					{ label: 'Id', dataField: 'id', dataType: 'number' },
					{ label: 'Product', dataField: 'productName', dataType: 'string' },
					{ label: 'Unit Price', dataField: 'price', dataType: 'number' },
					{ label: 'Purchased', dataField: 'purchased', dataType: 'datetime' },
					{ label: 'Available', dataField: 'available', dataType: 'boolean' }
				]
			}
			}
		});
	</script>
Another option is to create the QueryBuilder is by using the traditional Javascript way:
	const querybuilder = document.createElement('smart-query-builder');

	querybuilder.disabled = true;
	document.body.appendChild(querybuilder);
Smart framework provides a way to dynamically create a web component on demand from a DIV tag which is used as a host. The following imports the web component's module and creates it on demand, when the document is ready. The #querybuilder is the ID of a DIV tag.
	import "../../source/modules/smart.querybuilder.js";

	document.readyState === 'complete' ? init() : window.onload = init;

	function init() {
		const querybuilder = new Smart.QueryBuilder('#querybuilder', {
				allowDrag: true,
				fields: [
					{ label: 'Id', dataField: 'id', dataType: 'number' },
					{ label: 'Product', dataField: 'productName', dataType: 'string' },
					{ label: 'Unit Price', dataField: 'price', dataType: 'number' },
					{ label: 'Purchased', dataField: 'purchased', dataType: 'datetime' },
					{ label: 'Available', dataField: 'available', dataType: 'boolean' }
				]
			});
	}
- Open the page in your web server.
Building a Filter Query
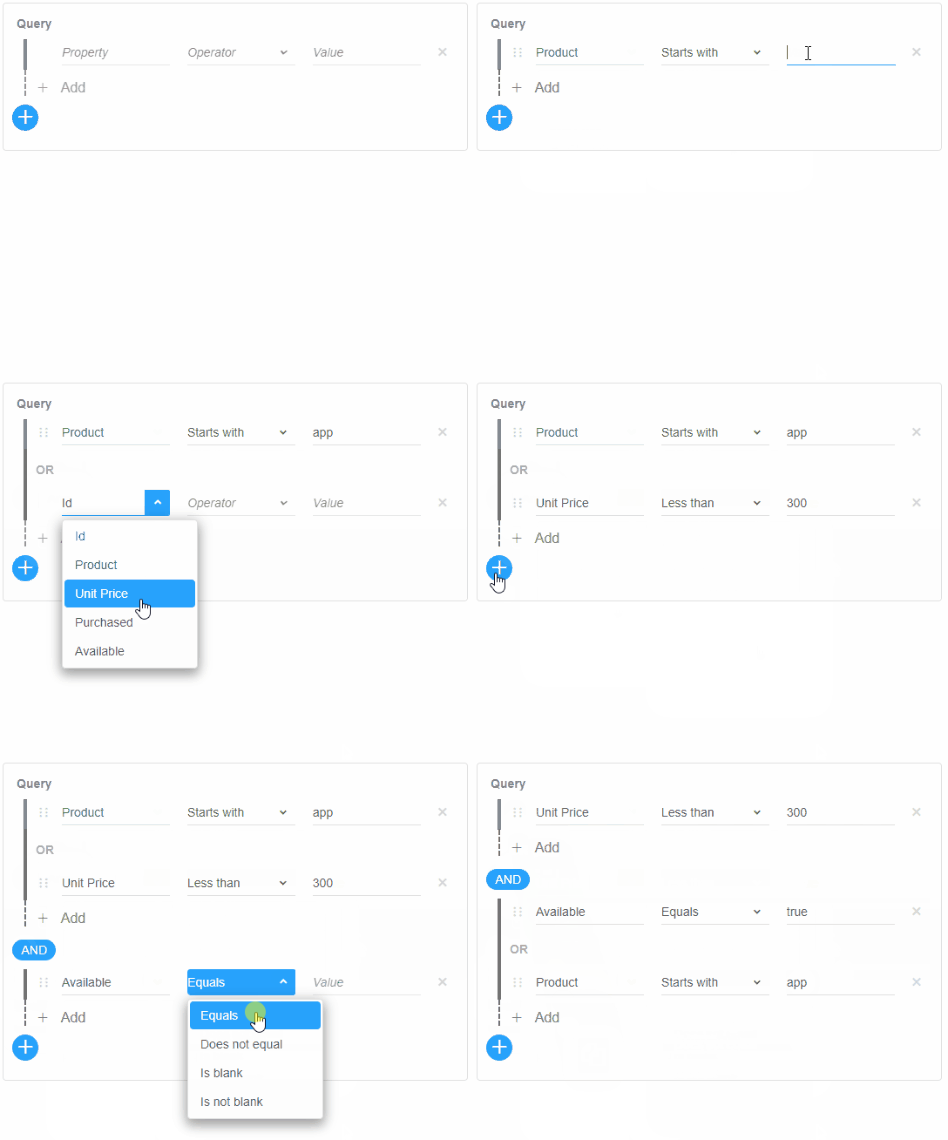
A complex filter query can be built by adding and manipulating conditions in the QueryBuilder's UI. In the element's initialization code, an array of fields to choose from is passed.
<!DOCTYPE html>
<html>
<head>
    <link rel="stylesheet" type="text/css" href=../../source/styles/smart.default.css" />
    <script type="text/javascript" src="../../source/smart.element.js"></script>
    <script type="text/javascript" src="../../source/smart.button.js"></script>
    <script type="text/javascript" src="../../source/smart.scrollbar.js"></script>
    <script type="text/javascript" src="../../source/smart.menu.js"></script>
    <script type="text/javascript" src="../../source/smart.input.js"></script>
    <script type="text/javascript" src="../../source/smart.complex.js"></script>
    <script type="text/javascript" src="../../source/smart.math.js"></script>
    <script type="text/javascript" src="../../source/smart.numeric.js"></script>
    <script type="text/javascript" src="../../source/smart.numerictextbox.js"></script>
    <script type="text/javascript" src="../../source/smart.calendar.js"></script>
    <script type="text/javascript" src="../../source/smart.date.js"></script>
    <script type="text/javascript" src="../../source/smart.draw.js"></script>
    <script type="text/javascript" src="../../source/smart.dropdownlist.js"></script>
    <script type="text/javascript" src="../../source/smart.listbox.js"></script>
    <script type="text/javascript" src="../../source/smart.timepicker.js"></script>
    <script type="text/javascript" src="../../source/smart.tooltip.js"></script>
    <script type="text/javascript" src="../../source/smart.datetimepicker.js"></script>
    <script type="text/javascript" src="../../source/smart.checkbox.js"></script>
    <script type="text/javascript" src="../../source/smart.filterbuilder.js"></script>
    <script>
        Smart('#queryBuilder', class {
            get properties() {
                return {
                    allowDrag: true,
                    fields: [
                        { label: 'Id', dataField: 'id', dataType: 'number' },
                        { label: 'Product', dataField: 'productName', dataType: 'string' },
                        { label: 'Unit Price', dataField: 'price', dataType: 'number' },
                        { label: 'Purchased', dataField: 'purchased', dataType: 'datetime' },
                        { label: 'Available', dataField: 'available', dataType: 'boolean' }
                    ]
                };
            }
        });
    </script>
</head>
<body>
    <smart-query-builder id="queryBuilder"></smart-query-builder>
</body>
</html>
Demo

The shown operations result in the following value:
[[["price","<","300"]],"and",[["available","=",true],"or",["productName","startswith","app"]]]
Whether or not conditions can be dragged is controlled by the property allowDrag.
Setting value Initially
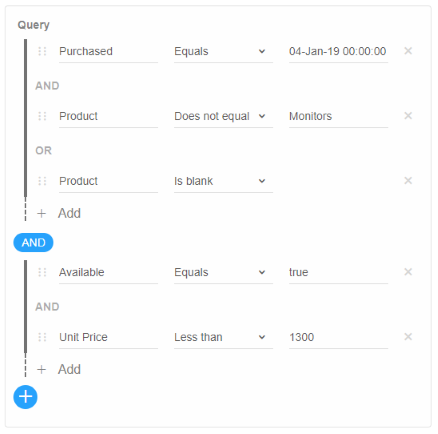
A QueryBuilder can be initialized with a predefined value, as shown in the example below:
<!DOCTYPE html>
<html>
<head>
    <link rel="stylesheet" type="text/css" href=../../source/styles/smart.default.css" />
    <script type="text/javascript" src="../../source/smart.element.js"></script>
    <script type="text/javascript" src="../../source/smart.button.js"></script>
    <script type="text/javascript" src="../../source/smart.scrollbar.js"></script>
    <script type="text/javascript" src="../../source/smart.menu.js"></script>
    <script type="text/javascript" src="../../source/smart.input.js"></script>
    <script type="text/javascript" src="../../source/smart.complex.js"></script>
    <script type="text/javascript" src="../../source/smart.math.js"></script>
    <script type="text/javascript" src="../../source/smart.numeric.js"></script>
    <script type="text/javascript" src="../../source/smart.numerictextbox.js"></script>
    <script type="text/javascript" src="../../source/smart.calendar.js"></script>
    <script type="text/javascript" src="../../source/smart.date.js"></script>
    <script type="text/javascript" src="../../source/smart.draw.js"></script>
    <script type="text/javascript" src="../../source/smart.dropdownlist.js"></script>
    <script type="text/javascript" src="../../source/smart.listbox.js"></script>
    <script type="text/javascript" src="../../source/smart.timepicker.js"></script>
    <script type="text/javascript" src="../../source/smart.tooltip.js"></script>
    <script type="text/javascript" src="../../source/smart.datetimepicker.js"></script>
    <script type="text/javascript" src="../../source/smart.checkbox.js"></script>
    <script type="text/javascript" src="../../source/smart.filterbuilder.js"></script>
    <script>
        Smart('#queryBuilder', class {
            get properties() {
                return {
                    allowDrag: true,
                    fields: [
                        { label: 'Id', dataField: 'id', dataType: 'number' },
                        { label: 'Product', dataField: 'productName', dataType: 'string' },
                        { label: 'Unit Price', dataField: 'price', dataType: 'number' },
                        { label: 'Purchased', dataField: 'purchased', dataType: 'datetime' },
                        { label: 'Available', dataField: 'available', dataType: 'boolean' }
                    ],
                    value: [
                        [
                            ['purchased', '=', new Date(2019, 0, 4)],
                            'and',
                            ['productName', '<>', 'Monitors'],
                            'or',
                            ['productName', 'isblank']
                        ],
                        'and',
                        [
                            ['available', '=', true],
                            'and',
                            ['price', '<', 1300],
                        ]
                    ]
                };
            }
        });
    </script>
</head>
<body>
    <smart-query-builder id="queryBuilder"></smart-query-builder>
</body>
</html>
Demo

Custom Operations
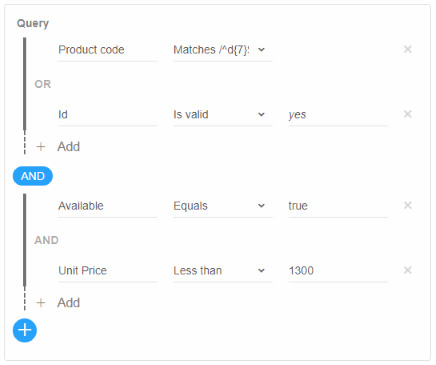
Apart from standard comparison operations, such as Equals, Greater than, Less than, and Contains, users can define their own custom operations to use when creating queries with Smart.QueryBuilder:
Custom operations are defined by setting the customOperations property. Each member of this array can have the following fields:
- label - label to be displayed in the operator box. Multiple operations with the same label can exist.
- name - unique name of the operation
- editorTemplate - callback function that creates a custom value editor
- valueTemplate - callback function that displays the value after the edior has been closed
- handleValue - callback function that handles the value returned by the editor when it is closed
- hideValue - a boolean condition that specifies whether the operation requires a value or not
The name of the custom operation also has to be included in the filterOperations property/array of the field(s) it is applicable to.
<!DOCTYPE html>
<html>
<head>
    <link rel="stylesheet" type="text/css" href=../../source/styles/smart.default.css" />
    <script type="text/javascript" src="../../source/smart.element.js"></script>
    <script type="text/javascript" src="../../source/smart.button.js"></script>
    <script type="text/javascript" src="../../source/smart.scrollbar.js"></script>
    <script type="text/javascript" src="../../source/smart.menu.js"></script>
    <script type="text/javascript" src="../../source/smart.input.js"></script>
    <script type="text/javascript" src="../../source/smart.complex.js"></script>
    <script type="text/javascript" src="../../source/smart.math.js"></script>
    <script type="text/javascript" src="../../source/smart.numeric.js"></script>
    <script type="text/javascript" src="../../source/smart.numerictextbox.js"></script>
    <script type="text/javascript" src="../../source/smart.calendar.js"></script>
    <script type="text/javascript" src="../../source/smart.date.js"></script>
    <script type="text/javascript" src="../../source/smart.draw.js"></script>
    <script type="text/javascript" src="../../source/smart.dropdownlist.js"></script>
    <script type="text/javascript" src="../../source/smart.listbox.js"></script>
    <script type="text/javascript" src="../../source/smart.timepicker.js"></script>
    <script type="text/javascript" src="../../source/smart.tooltip.js"></script>
    <script type="text/javascript" src="../../source/smart.datetimepicker.js"></script>
    <script type="text/javascript" src="../../source/smart.checkbox.js"></script>
    <script type="text/javascript" src="../../source/smart.filterbuilder.js"></script>
    <script>
        Smart('#queryBuilder', class {
            get properties() {
                return {
                    customOperations: [
                        { label: 'Matches /^\d{7}$/g', name: '/^\d{7}$/g', hideValue: true },
                        {
                            label: 'Is valid',
                            name: 'isvalid',
                            editorTemplate: function (fieldType, value, fieldData) {
                                const editor1 = document.createElement('smart-radio-button'),
                                    editor2 = document.createElement('smart-radio-button'),
                                    container = document.createElement('div');

                                editor1.innerHTML = 'Yes';
                                editor2.innerHTML = 'No';
                                container.className = 'container';

                                if (typeof value !== 'boolean') {
                                    value = !!parseFloat(value);
                                }

                                editor1.checked = value;
                                editor2.checked = !value;

                                container.appendChild(editor1);
                                container.appendChild(editor2);

                                return container;
                            },
                            valueTemplate: function (editor, value) {
                                return value ? '<em>yes</em>' : '<em>no</em>';
                            },
                            handleValue: function (editor) {
                                const editors = editor.getElementsByTagName('smart-radio-button');

                                return editors[0].checked;
                            }
                        }],
                    fields: [
                        { label: 'Id', dataField: 'id', dataType: 'number', filterOperations: ['=', '<', '>', 'isvalid'] },
                        { label: 'Product', dataField: 'productName', dataType: 'string' },
                        { label: 'Product code', dataField: 'productCode', dataType: 'string', filterOperations: ['=', '/^\d{7}$/g'] },
                        { label: 'Unit Price', dataField: 'price', dataType: 'number' },
                        { label: 'Produced', dataField: 'produced', dataType: 'date', filterOperations: ['<', '>'] },
                        { label: 'Purchased', dataField: 'purchased', dataType: 'datetime' },
                        { label: 'Available', dataField: 'available', dataType: 'boolean' }
                    ],
                    value: [
                        [
                            ['productCode', '/^\d{7}$/g'],
                            'or',
                            ['id', 'isvalid', true]
                        ],
                        'and',
                        [
                            ['available', '=', true],
                            'and',
                            ['price', '<', 1300],
                        ]
                    ]
                }
            }
        });
    </script>
</head>
<body>
    <smart-query-builder id="queryBuilder"></smart-query-builder>
</body>
</html>
Demo

Operation Icons
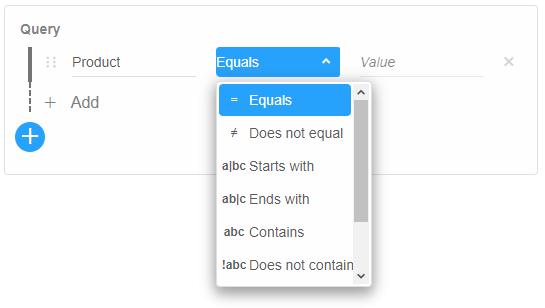
Icons can be shown next to labels in the coparison operation box by setting the property showIcons to true. The icons property, on the other hand, defines CSS classes to be applied to each of the built-in operations. Icons for these classes are applied in the smart-query-builder style sheet.
Demo

To apply a custom icon to a particular operation, add CSS that defines the icon's appearance:
<style type="text/css">
    .custom-equals-icon:after {
        background-image: url("https://img.icons8.com/officel/16/000000/equal-sign.png");
    }
</style>
then set the respective icons field (in this case, '=', the Equals operation) to the name of the class defined in the CSS:
document.getElementById('queryBuilder').icons['='] = 'custom-equals-icon';
Create, Append, Remove, Get/Set Property, Invoke Method, Bind to Event
Create a new element:
const querybuilder = document.createElement('smart-query-builder');
Append it to the DOM:
document.body.appendChild(querybuilder);
Remove it from the DOM:
querybuilder.parentNode.removeChild(querybuilder);
Set a property:
querybuilder.propertyName = propertyValue;
Get a property value:
const propertyValue = querybuilder.propertyName;
Invoke a method:
querybuilder.methodName(argument1, argument2);
Add Event Listener:
	const eventHandler = (event) => {
	   // your code here.
	};

	querybuilder.addEventListener(eventName, eventHandler);
Remove Event Listener:
querybuilder.removeEventListener(eventName, eventHandler, true);
Using with Typescript
Smart Web Components package includes TypeScript definitions which enables strongly-typed access to the Smart UI Components and their configuration.
Inside the download package, the typescript directory contains .d.ts file for each web component and a smart.elements.d.ts typescript definitions file for all web components. Copy the typescript definitions file to your project and in your TypeScript file add a reference to smart.elements.d.ts
Read more about using Smart UI with Typescript.Getting Started with Angular QueryBuilder Component
Setup Angular Environment
Angular provides the easiest way to set angular CLI projects using Angular CLI tool.
Install the CLI application globally to your machine.
npm install -g @angular/cli
Create a new Application
ng new smart-angular-querybuilder
Navigate to the created project folder
cd smart-angular-querybuilder
Setup the QueryBuilder
Smart UI for Angular is distributed as smart-webcomponents-angular NPM package
- Download and install the package.
npm install smart-webcomponents-angular
- Adding CSS reference
The following CSS file is available in ../node_modules/smart-webcomponents-angular/ package folder. This can be referenced in [src/styles.css] using following code.@import 'smart-webcomponents-angular/source/styles/smart.default.css';
Another way to achieve the same is to edit the angular.json file and in the styles add the style."styles": [ "node_modules/smart-webcomponents-angular/source/styles/smart.default.css" ]
If you want to use Bootstrap, Fluent or other themes available in the package, you need to add them after 'smart.default.css'. -
Example with Angular Standalone Components
app.component.html
 <div class="demo-description">The Query Builder component allows you to build complex quieries through
    UI. The output of the component is a JSON object with the query.</div>
<smart-query-builder
#querybuilder id="queryBuilder"></smart-query-builder>
app.component.ts
 import { Component, ViewChild, OnInit, AfterViewInit } from '@angular/core';
import { QueryBuilderComponent } from 'smart-webcomponents-angular/querybuilder';


import { CommonModule } from '@angular/common';
import { RouterOutlet } from '@angular/router';
import { QueryBuilderModule } from 'smart-webcomponents-angular/querybuilder';

@Component({
    selector: 'app-root',
	standalone: true,
	imports: [CommonModule, QueryBuilderModule, RouterOutlet],
    templateUrl: './app.component.html',
	styleUrls: ['./app.component.css']
})

export class AppComponent implements AfterViewInit, OnInit {
	@ViewChild('querybuilder', { read: QueryBuilderComponent, static: false }) querybuilder!: QueryBuilderComponent;


	ngOnInit(): void {
		// onInit code.
	}

	ngAfterViewInit(): void {
		// afterViewInit code.
		this.init();
    }

	init(): void {
		// init code.

    window.Smart('#queryBuilder', class {
        get properties() {
            return {
                allowDrag: true,
                fields: [
                    { label: 'Id', dataField: 'id', dataType: 'number' },
                    { label: 'Product', dataField: 'productName', dataType: 'string' },
                    { label: 'Unit Price', dataField: 'price', dataType: 'number' },
                    { label: 'Purchased', dataField: 'purchased', dataType: 'datetime' },
                    { label: 'Available', dataField: 'available', dataType: 'boolean' }
                ]
            };
        }
    });

	}
}
-
Example with Angular NGModule
app.component.html
 <div class="demo-description">The Query Builder component allows you to build complex quieries through
    UI. The output of the component is a JSON object with the query.</div>
<smart-query-builder
#querybuilder id="queryBuilder"></smart-query-builder>
app.component.ts
 import { Component, ViewChild, OnInit, AfterViewInit } from '@angular/core';
import { QueryBuilderComponent } from 'smart-webcomponents-angular/querybuilder';


@Component({
    selector: 'app-root',
    templateUrl: './app.component.html',
	styleUrls: ['./app.component.css']
})

export class AppComponent implements AfterViewInit, OnInit {
	@ViewChild('querybuilder', { read: QueryBuilderComponent, static: false }) querybuilder!: QueryBuilderComponent;


	ngOnInit(): void {
		// onInit code.
	}

	ngAfterViewInit(): void {
		// afterViewInit code.
		this.init();
    }

	init(): void {
		// init code.

    window.Smart('#queryBuilder', class {
        get properties() {
            return {
                allowDrag: true,
                fields: [
                    { label: 'Id', dataField: 'id', dataType: 'number' },
                    { label: 'Product', dataField: 'productName', dataType: 'string' },
                    { label: 'Unit Price', dataField: 'price', dataType: 'number' },
                    { label: 'Purchased', dataField: 'purchased', dataType: 'datetime' },
                    { label: 'Available', dataField: 'available', dataType: 'boolean' }
                ]
            };
        }
    });

	}
}
app.module.ts
 import { NgModule } from '@angular/core';
import { BrowserModule } from '@angular/platform-browser';

import { QueryBuilderModule } from 'smart-webcomponents-angular/querybuilder';

import { AppComponent } from './app.component';

@NgModule({
    declarations: [ AppComponent ],
    imports: [ BrowserModule, QueryBuilderModule ],
    bootstrap: [ AppComponent ]
})

export class AppModule { }
Running the Angular application
After completing the steps required to render a QueryBuilder, run the following command to display the output in your web browser
ng serveand open localhost:4200 in your favorite web browser.
Read more about using Smart UI for Angular: https://www.htmlelements.com/docs/angular-cli/.
Getting Started with React QueryBuilder Component
Setup React Environment
The easiest way to start with React is to use NextJS Next.js is a full-stack React framework. It’s versatile and lets you create React apps of any size—from a mostly static blog to a complex dynamic application.
npx create-next-app my-app
cd my-app
npm run dev
or
yarn create next-app my-app
cd my-app
yarn run dev
Preparation
Setup the QueryBuilder
Smart UI for React is distributed as smart-webcomponents-react package
- Download and install the package.
In your React Next.js project, run one of the following commands to install Smart UI QueryBuilder for ReactWith NPM:
npm install smart-webcomponents-react
With Yarn:yarn add smart-webcomponents-react
- Once installed, import the React QueryBuilder Component and CSS files in your application and render it.
app.js
import 'smart-webcomponents-react/source/styles/smart.default.css';
import React from "react";
import ReactDOM from 'react-dom/client';
import { QueryBuilder } from 'smart-webcomponents-react/querybuilder';

class App extends React.Component {


	componentDidMount() {

	}

	render() {
		return (
			<div>
				<div className="demo-description">The Query Builder component allows you to build complex quieries through
			        UI. The output of the component is a JSON object with the query.</div>
				<QueryBuilder allowDrag
					fields={[{
						label: 'Id',
						dataField: 'id',
						dataType: 'number'
					},
					{
						label: 'Product',
						dataField: 'productName',
						dataType: 'string'
					},
					{
						label: 'Unit Price',
						dataField: 'price',
						dataType: 'number'
					},
					{
						label: 'Purchased',
						dataField: 'purchased',
						dataType: 'datetime'
					},
					{
						label: 'Available',
						dataField: 'available',
						dataType: 'boolean'
					}
					]}
				    id="queryBuilder"></QueryBuilder>
			</div >
		);
	}
}


export default App;
Running the React application
Start the app withnpm run devor
yarn run devand open localhost:3000 in your favorite web browser to see the output.
Setup with Vite
Vite (French word for "quick", pronounced /vit/, like "veet") is a build tool that aims to provide a faster and leaner development experience for modern web projectsWith NPM:
npm create vite@latestWith Yarn:
yarn create viteThen follow the prompts and choose React as a project.
Navigate to your project's directory. By default it is 'vite-project' and install Smart UI for React
In your Vite project, run one of the following commands to install Smart UI QueryBuilder for ReactWith NPM:
npm install smart-webcomponents-reactWith Yarn:
yarn add smart-webcomponents-reactOpen src/App.tsx App.tsx
import 'smart-webcomponents-react/source/styles/smart.default.css';
import React from "react";
import ReactDOM from 'react-dom/client';
import { QueryBuilder } from 'smart-webcomponents-react/querybuilder';

class App extends React.Component {


	componentDidMount() {

	}

	render() {
		return (
			<div>
				<div className="demo-description">The Query Builder component allows you to build complex quieries through
			        UI. The output of the component is a JSON object with the query.</div>
				<QueryBuilder allowDrag
					fields={[{
						label: 'Id',
						dataField: 'id',
						dataType: 'number'
					},
					{
						label: 'Product',
						dataField: 'productName',
						dataType: 'string'
					},
					{
						label: 'Unit Price',
						dataField: 'price',
						dataType: 'number'
					},
					{
						label: 'Purchased',
						dataField: 'purchased',
						dataType: 'datetime'
					},
					{
						label: 'Available',
						dataField: 'available',
						dataType: 'boolean'
					}
					]}
				    id="queryBuilder"></QueryBuilder>
			</div >
		);
	}
}


export default App;
Read more about using Smart UI for React: https://www.htmlelements.com/docs/react/.
Getting Started with Vue QueryBuilder Component
Setup Vue with Vite
In this section we will introduce how to scaffold a Vue Single Page Application on your local machine. The created project will be using a build setup based on Vite and allow us to use Vue Single-File Components (SFCs). Run the following command in your command linenpm create vue@latestThis command will install and execute create-vue, the official Vue project scaffolding tool. You will be presented with prompts for several optional features such as TypeScript and testing support:
✔ Project name: …If you are unsure about an option, simply choose No by hitting enter for now. Once the project is created, follow the instructions to install dependencies and start the dev server:✔ Add TypeScript? … No / Yes ✔ Add JSX Support? … No / Yes ✔ Add Vue Router for Single Page Application development? … No / Yes ✔ Add Pinia for state management? … No / Yes ✔ Add Vitest for Unit testing? … No / Yes ✔ Add an End-to-End Testing Solution? … No / Cypress / Playwright ✔ Add ESLint for code quality? … No / Yes ✔ Add Prettier for code formatting? … No / Yes Scaffolding project in ./ ... Done.
cdnpm install npm install smart-webcomponents npm run dev
-
Make Vue ignore custom elements defined outside of Vue (e.g., using the Web Components APIs). Otherwise, it will throw a warning about an Unknown custom element, assuming that you forgot to register a global component or misspelled a component name.
Open vite.config.js in your favorite text editor and change its contents to the following:
vite.config.js
import { fileURLToPath, URL } from 'node:url' import { defineConfig } from 'vite' import vue from '@vitejs/plugin-vue' // https://vitejs.dev/config/ export default defineConfig({ plugins: [ vue({ template: { compilerOptions: { isCustomElement: tag => tag.startsWith('smart-') } } }) ], resolve: { alias: { '@': fileURLToPath(new URL('./src', import.meta.url)) } } }) -
Open src/App.vue in your favorite text editor and change its contents to the following:
App.vue
<template>
  <div class="vue-root">
    <div class="demo-description">
      The Query Builder component allows you to build complex quieries through
      UI. The output of the component is a JSON object with the query.
    </div>
    <smart-query-builder id="queryBuilder"></smart-query-builder>
  </div>
</template>

<script>
import { onMounted } from "vue";
import "smart-webcomponents/source/styles/smart.default.css";
import "smart-webcomponents/source/modules/smart.querybuilder.js";

export default {
  name: "app",
  setup() {
    onMounted(() => {
      window.Smart(
        "#queryBuilder",
        class {
          get properties() {
            return {
              allowDrag: true,
              fields: [
                {
                  label: "Id",
                  dataField: "id",
                  dataType: "number"
                },
                {
                  label: "Product",
                  dataField: "productName",
                  dataType: "string"
                },
                {
                  label: "Unit Price",
                  dataField: "price",
                  dataType: "number"
                },
                {
                  label: "Purchased",
                  dataField: "purchased",
                  dataType: "datetime"
                },
                {
                  label: "Available",
                  dataField: "available",
                  dataType: "boolean"
                }
              ]
            };
          }
        }
      );
    });
  }
};
</script>

<style>
body {
  height: 800px;
}
</style>
We can now use the smart-query-builder with Vue 3. Data binding and event handlers will just work right out of the box.
Running the Vue application
Start the app withnpm run devand open http://localhost:5173/ in your favorite web browser to see the output below:
When you are ready to ship your app to production, run the following:
npm run buildThis will create a production-ready build of your app in the project's ./dist directory.
Read more about using Smart UI for Vue: https://www.htmlelements.com/docs/vue/.