ASP .NET Blazor WASM & .NET 6
We are happy to share with you that the latest Smart.Blazor NuGET package targets .NET 6.0 by default.
The code sample below shows how to create a Blazor WebAssembly app with .NET 6 Blazor WebAssembly (blazorwasm) Example1. Create a blazor application: dotnet new blazorwasm -o BlazorApp 2. Navigate to the application: cd BlazorApp 3. Add the Smart.Blazor package: dotnet add package Smart.Blazor 4. Open _Imports.razor and add the following at the bottom: @using Smart.Blazor 5. Open wwwroot/index.html and add the needed styles and scripts. <!DOCTYPE html>
<html>
<head>
<meta charset="utf-8" />
<meta name="viewport" content="width=device-width, initial-scale=1.0, maximum-scale=1.0, user-scalable=no" />
<title>Blazor WebAssembly App</title>
<base href="/" />
<link href="css/bootstrap/bootstrap.min.css" rel="stylesheet" />
<link href="css/app.css" rel="stylesheet" />
<link href="_framework/scoped.styles.css" rel="stylesheet" />
<link href="_content/Smart.Blazor/css/smart.default.css" rel="stylesheet" />
<script src="_content/Smart.Blazor/js/smart.blazor.js"></script>
<script src="_content/Smart.Blazor/js/smart.elements.js"></script>
</head>
<body>
<div id="app">Loading...</div>
<div id="blazor-error-ui">
An unhandled error has occurred.
<a href="" class="reload">Reload</a>
<a class="dismiss">🗙</a>
</div>
<script src="_framework/blazor.webassembly.js"></script>
</body>
</html>
6. Open Pages/Index.razor and replace the code as follows:@page "/"
@inject HttpClient Http
<h1>Weather forecast</h1>
<p>This component demonstrates fetching data from the server.</p>
@if (forecasts == null)
{
<p><em>Loading...</em></p>
}
else
{
<Table Selection="true" SortMode="TableSortMode.One" class="table">
<table>
<thead>
<tr>
<th>Date</th>
<th>Temp. (C)</th>
<th>Temp. (F)</th>
<th>Summary</th>
</tr>
</thead>
<tbody>
@foreach (var forecast in forecasts)
{
<tr>
<td>@forecast.Date.ToShortDateString()</td>
<td>@forecast.TemperatureC</td>
<td>@forecast.TemperatureF</td>
<td>@forecast.Summary</td>
</tr>
}
</tbody>
</table>
</Table>
}
@code {
private WeatherForecast[] forecasts;
protected override async Task OnInitializedAsync()
{
forecasts = await Http.GetFromJsonAsync<WeatherForecast[]>("sample-data/weather.json");
}
public class WeatherForecast
{
public DateTime Date { get; set; }
public int TemperatureC { get; set; }
public string Summary { get; set; }
public int TemperatureF => 32 + (int)(TemperatureC / 0.5556);
}
}
7. Edit Program.cs
using BlazorApp;
using Microsoft.AspNetCore.Components.Web;
using Microsoft.AspNetCore.Components.WebAssembly.Hosting;
using Smart.Blazor;
var builder = WebAssemblyHostBuilder.CreateDefault(args);
builder.RootComponents.Add<App>("#app");
builder.RootComponents.Add<HeadOutlet>("head::after");
builder.Services.AddScoped(sp => new HttpClient { BaseAddress = new Uri(builder.HostEnvironment.BaseAddress) });
builder.Services.AddSmart();
await builder.Build().RunAsync();
8. Start the app and check the result dotnet watch run Wait for the app to display that it's listening on http://localhost:5000 and then, open a browser and navigate to that address. Once you get to the following page, you have successfully run your first Blazor WebAssembly app using Smart UI for Blazor Components! Output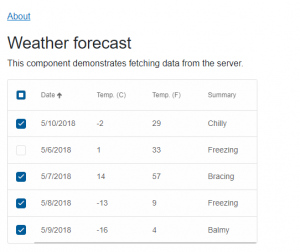
This entry was posted in Uncategorized. Bookmark the permalink.
|
|